
Your HYDRA is pre-loaded with a simple “Asteroids” clone demo programmed into the on-board serial EEPROM at U4 (top left of the Propeller chip).
We will use this to test your system out. The following are a series of steps to try the demo out and make sure your hardware is working and a stray high energy neutron didn’t damage your EEPROM!
Step 1: Place your HYDRA on a flat surface, no carpet! Static electricity!
Step 2: Make sure the power switch at the front is in the OFF position, this is to the RIGHT.
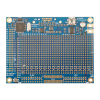
Step 3: Plug your wall adapter in and plug the 2.1 mm power connector into the female port located at the top-left corner of the HYDRA.
Step 4: Make sure the XTAL marked 10 MHz is inserted into the XTAL port, top-center above the Propeller chip at J13. It’s possible that during transport the XTAL came loose and
isn’t inserted all the way and/or is loose in the packaging, so make sure the XTAL is inserted.
Step 5: If you have plugged the cartridge into the system, then UNPLUG it – we want to run the code off the serial 128K EEPROM memory which is on-board (located top-left above
the Propeller chip).
Step 6: Insert the A/V cable into the yellow (video) and white (audio) port of the HYDRA located top-right of the board, insert them into your NTSC/Multi-System TV’s A/V port, and
then switch your TV set to “Video Input” mode.
....